The southwestern corner of South Dakota has an embarrassment of riches when it comes to parks (state and national), gorgeous scenery, epic hikes, interesting small towns, and just a ton of fun things to do in general. I planned a pretty epic 6 days and we still had to leave things for next time. (And there will be a next time! I loved this corner of South Dakota).
We saw 2 national parks, one of the best state parks in the US, biked one of my favorite rails-to-trails rides ever, and stumbled upon some fun hidden gems, always one of the things I love best about any trip.

Heads Up: This post may contain affiliate links, meaning we may get a commission if you make a purchase through our links, at no additional cost to you. We don’t do sponsored posts, free trips, or accept items for reviews. We only link to things we like and use personally. Read more about our philosophy.
Overview Of 6 Days In Badlands And Black Hills

Note About This Itinerary- It Does Not Encompass Everything There Is To Do In This Part Of South Dakota
We ended up leaving awesome things out simply because we ran out of time to do it all– at least without turning the trip into an intense marathon of one activity after another and not much of an actual vacation. (Running around like crazy is what we do at home.)
We also had to skip some things because of closures or availability since we were there in fall. We did not stay in Custer State Park for instance, because the lodges were full or already closed for the year.
Also, the famous Wildlife Loop Road in Custer was closed while we were there for road repairs. I made a note in the itinerary where I would have done some things differently had we been able to or what we want to do on our next trip.

Day 1: Arrival And Wind Cave National Park
Morning
- Fly into Rapid City Airport
- Pick up a rental car
Lunch
- Get something on the road to Wind Cave National Park
Afternoon
- Take one of 3 cave tours at Wind Cave National Park
- Hike a short trail in the park
Evening & Overnight
- Dinner in Firehouse Brewing Co. or another restaurant in downtown Rapid City
- Stay at the Residence Inn & Suites in Rapid City

Morning – Arrival At Rapid City Airport
We arrived at 11:15 am after leaving Tennessee super early in the morning. Rapid City’s airport is small but nice. We quick-walked to the Alamo counter from the plane and had our car and luggage not more than 30 minutes after we landed and deplaned. That alone made me have warm fuzzies about Rapid City.
The rental car lots are right outside the doors from the rental counters so it was easy to load up the kids and luggage into our rental car.
*Pro- Tip– Beeline to the rental counter from your plane. The lines built up fast since each of the counters only had 1 person working. We split up and had the adults go straight to the car rental counter while kids waited for luggage. Bathroom breaks waited until we got the cars- 7 people in our group meant 2 cars. We were the first people in line from our plane and it was absolutely worth it. Probably saved us 20-30 min of line waiting.
Drive To Wind Cave National Park
90 min from Rapid City Airport
We drove straight to Wind Cave National Park from the airport because we wanted to try and get on a cave tour. Getting there is easy as the majority of the trip is simply driving south on Hwy 79, which is a nice 4 lane divided highway.
Google will suggest turning on 7-11 Rd/Custer County Route 101 to cut over to Wind Cave National Park from Hwy 79. That is an 8 mile gravel road. It looked well maintained when we passed it but we decided to skip the shortcut and stay on Hwy 79 a few more miles south until we got to the signs for Hot Springs and took that road instead. That way we stayed on paved road the whole way.
Going thru Hot Springs only added about 8 minutes to our trip versus the unpaved road shortcut. And I didn’t have to worry about unpaved roads and rental cars. (Although by the end of our South Dakota trip, I stopped worrying about that as it turns out that a few things we wanted to see were on gravel roads. The rental car survived just fine.)
Lunch- In The Car
We brought a ton of granola bars with us in our luggage, plus we got snacks on the plane so we did not stop for lunch. There isn’t a whole lot between the airport and Wind Cave on Highway 79 besides gas stations although some of the gas stations were big truck stops with large convenience stores.
Hot Springs has some restaurants and the historic part of town is lovely, with distinctive red sandstone buildings and a greenway along the warm water creek that gives Hot Springs its name. Try Two Cows Creamery & Bistro, Southern Hills Mercantile And Taproom, or Mornin’ Sunshine Coffee House.
Afternoon- Wind Cave National Park
Approximately 1:30pm- 4:30 pm including cave tour and a short hike
I really didn’t know much about Wind Cave prior to our visit; in fact, I hadn’t even heard of it until we got a map of all the National Parks that you can stick a pin in when you have visited. (If you haven’t seen these yet, they are super cool and our family loves ours. Fantastic Christmas gift.)
So I really didn’t know what to expect when we arrived at Wind Cave at 130pm. I went straight to the desk in the Visitor Center to see if there were any tickets left for any of the cave tours that day. We hadn’t booked ahead because I never have that much faith in flight arrivals anymore. The surest way to make sure you are delayed is to have something non refundable booked right after you land.
Luckily though, they had enough spots left on the 230 pm Natural Entrances tour for the 6 of us. This was only because we were here in early October and on a weekday — if it was summer, the rangers said they sell out shortly after opening the doors.

* We swung back by Wind Cave at the end of our trip to see if we could get on the Garden of Eden tour one morning when it was raining but it was sold out when we got there. That was on a Saturday so be aware it can sell out on the weekends even in October.
The Natural Entrance Tour was about an hour and 15 min long, including a short talk by the ranger above ground beforehand. Read my blog about it you want a more detailed review of the Wind Cave tours.
In short- the tour was absolutely fantastic and the kids loved it. In fact, 3 out of 4 kids wanted to see if we could get on the Garden of Eden tour immediately after we finished the Natural Entrance tour. (One kid is a little claustrophobic so while he enjoyed the cave tour, he wasn’t eager to go right back underground.)
For lots more pictures of Wind Cave, more information about the various tours available, the hikes you can do, and the campground at Wind Cave, read:
We finished up our time at Wind Cave National Park by taking the short but beautiful Prairie Vista Trail which starts just behind the Visitor Center. It is an easy 1 mile RT loop, climbs up a short ways to have some beautiful views out over the prairie (hence the name), has neat information signs that point out where you just walked just before on the cave tour. You can now say you have walked above and below the same piece of Earth.

Dinner And Overnight- Rapid City
Hotel – Residence Inn Rapid City
We drove back to Rapid City and checked into our hotel, the Residence Inn Rapid City. It was a great hotel and we ended up staying 3 out of our 4 nights in Rapid City at this hotel.
The Residence Inn isn’t in downtown Rapid City, which would have been my first choice but it was expensive trying to find 2 hotel rooms for our large family group. The Residence Inn had the best rooms for the best price and was only 10 minutes away from downtown’s shops and restaurants.
I like a Residence Inn in general because they have large suites with full kitchens and 2 full bathrooms. This is immensely helpful when traveling with teenagers and their need for constant snacks as well as their inability to take a shower in under half an hour.
The Residence Inn Rapid City is at exit 61 off of I-90 and there were several hotels grouped together at this exit because of the WaTiki Waterpark Resort found there. It is apparently the largest indoor waterpark in South Dakota. We didn’t go but if you had younger kids, it looked like fun.
The hotel prices were pretty competitive in this little area around the waterpark, I guess because you had several hotels close to each other.
My other choice for lodging would have been the Hotel Alex Johnson in downtown Rapid City as it was a very cool historic hotel with a landmark rooftop terrace. It is in the middle of downtown and you can walk to all the good restaurants and shops.
Dinner – Firehouse Brewing Company
We headed to downtown Rapid City around 6:30 pm to explore and find some dinner. The main downtown area is a nice, multiple block area of 2-3 story brick buildings with an early 20th century vibe.
Since South Dakota’s state nickname is the “Mount Rushmore State” and Rapid City’s nickname is the “City of Presidents,” presidential themes ran rampant in these parts. We particularly liked the statues of the presidents on the street corners- there are 44 so far. I was surprised even the teenagers wanted to find them all but it was a fun after dinner activity. You can download the walking tour guide from the VisitRapidCity website.
We decided to eat at Firehouse Brewing Company since everyone was in the mood for American fare and we wanted to watch some sports. This family-friendly restaurant is in the old firehouse on Main St and leans into the shtick in a fun way. Food was good, the atmosphere was lively, and we liked it so much we ate there on our last night in South Dakota as well. (First and last night- I like symmetry.)
After stuffing ourselves at Firehouse and going on a Presidential Scavenger Hunt, we drove back to the Residence Inn and fell asleep at a decent time for another big day tomorrow.

Day 2: Minuteman Missile National Historic Site & Badlands National Park
Morning
- Picked up someone at Rapid City Airport
- Drive to Badlands National Park
- Stop at Minuteman Missile National Historic Site
Lunch
- Picnic in the parking lot of Minuteman National Historic Site
Afternoon
- Hike 3 short trails in Badlands National Park- Door, Notch, and Window trails
Evening & Overnight
- Stay in one of the cabins at Cedar Pass Lodge
- Get dinner to go from the Cedar Pass Lodge restaurant inside the park and eat at the picnic tables outside your cabin
- Sunset and stargazing from the open areas by Cedar Pass Lodge

Morning Day 2: Breakfast At Hotel And Airport Pickup In Rapid City
We had an easy start to our day since we had to pick up my sister-in-law from the Rapid City airport at 11:15 am. Kids enjoyed sleeping in and going to town on the Residence Inn’s complimentary breakfast buffet which was pretty good and the lobby had lots of room to spread out and eat. (I hate fighting people for the toaster and I especially hate hovering over people finishing their food so you can grab their table. So a roomy breakfast area is a big plus in my book.)
We checked out of the hotel just before 11 am, made the short drive to the airport, and we were quickly on our way headed east on I-90 towards Badlands National Park by 11:20 am. Bless small airports and on time flights!
It is just over an hour’s drive from the Rapid City airport to Badlands National Park.
Minuteman Missile National Historic Site In South Dakota
We decided to stop and check out the Minuteman Missile National Historic Site on the way to Badlands since they are right by the interstate.
For those of you unfamiliar with the Minuteman Missiles, they were weapons of mass destruction that were an integral part of the Cold War philosophy of mutually assured destruction. So thousands of missile silos were buried out in the Great Plains of the US, with launch control facilities nearby to control these nuclear ICBMs capable of reaching the USSR in 30 minutes. (Remember War Games? That beginning of that movie was set in a Minuteman Missile silo. You can check it out on You Tube if you aren’t as old as me.)
There are 3 stops along the interstate that make up the Minuteman Missile site: 1) a missile silo called Delta- 09, 2) the launch control facility called Delta 0-1, and 3), the Visitor Center. We saw all 3 in a little over 2 hours (but did not take the below ground tour of the launch control facility because it was closed).
You could just do the missile silo stop at Delta- 09 though if you were short on time, it is the one I wouldn’t miss. It takes about 30 minutes and it was definitely worth a stop. The kids thought it was great and wanted to keep listening to the free cell phone audio tour in the car as we went between the stops.
If you are interested in the Minuteman Missile Site (and it really was a neat stop that didn’t take too long), read VISITING THE MINUTEMAN MISSILE SITE WITH KIDS.
I cover what to expect at each of the 3 individual stops and how to book a tour of the underground Launch Control facility.

Looking into the missile silo at Delta-09 at the Minuteman Missile National Historic Park. This is one of 2 places in America where you can look into a ICBM missile silo—this one is holding an unarmed Minuteman Missile capable of flying 15,000 mph. You can see the Badlands rising up in the background, making a pretty amazing backdrop to this bit of history.
Lunch- Car Picnic
We brought bread, peanut butter, jelly, apples, and granola bars and made a picnic lunch in the parking lot of the Visitor Center of the Minuteman Missile site. We are a fancy bunch at heart.
There isn’t a lot around here for restaurants– Wall is the nearest town for that and it is 20 minutes west of the Minuteman Visitor Center on I90. (Don’t worry- we’ll get to the famous Wall Drug tomorrow.) There is a gas station/ convenience store/ souvenir shop outside the entrance to Badlands National Park which is only 5 minutes away from the Minuteman Missile Visitor Center if you didn’t pack a picnic like us.
There is also a lodge restaurant in the park which has decent prices and large portions considering its national park location (my bar is set low for that based on past experience).
Afternoon- Badlands National Park
After our quick makeshift picnic in the parking lot of the Minuteman Missile Visitor Center, we drove 5 min south on Hwy 240 to Badlands National Park. We stopped for gas at the Badlands Trading Post on the way.
*Pro Tip- You are definitely going to want to stop for gas before you get into the park as there are no gas stations inside Badlands National Park itself.
We have annual national park passes (America the Beautiful pass, $80, good at all national parks and federal recreational lands) and I highly recommend them. If you go to more than one park that charges an entrance fee in a year, they basically pay for themselves.
Or, you can buy a 7 day pass for $30 for Badlands National Park only. The entrance station where you can buy these passes is right by the sign as you get to the park.
We went straight to Cedar Pass Lodge to check in for the night. The lodge is less than 10 min down the road from the entrance station to Badlands. Check in at the main building and get your keys to your individual cabin.
We unloaded the cars and then headed back out to 3 of the most popular trails in the park, which conveniently share one parking area only a 5 minute drive from the lodge back towards the entrance.
Door, Notch, and Window Trails In Badlands National Park
Approximately 345 pm- 530 pm
The 3 trails we hiked that first afternoon in Badlands were Door, Notch, and Window Trails and they are all short trails that were easy to explore. Notch Trail is the most difficult of the 3 because you do have to climb a rustic ladder but it wasn’t hard- just maybe not for toddlers or anyone mobility impaired.
All 3 trails had wonderful views of the Badlands and we would do them all again. It only took us about 1 hr 45 min to hike all 3 trails, including some time watching a bighorn sheep that decided to grace us with some great photo ops.
We started at about 3:45 pm which worked out well because it was still about 80 degrees Fahrenheit, despite it being October. But the sun had begun to set behind some of the taller rock walls on the trails so you got some shade in places.
If we were visiting in summer, I would hike first thing in the morning or late in the afternoon as it gets to 90 or 100 degrees in the Badlands routinely. There is no shade on any of these trails if the sun is overhead. We applied lots of sunscreen and wore hats even in October.
For more detailed info, maps, and lots of pictures of these hikes, read 3 SHORT HIKES IN BADLANDS NATIONAL PARK GREAT FOR KIDS.

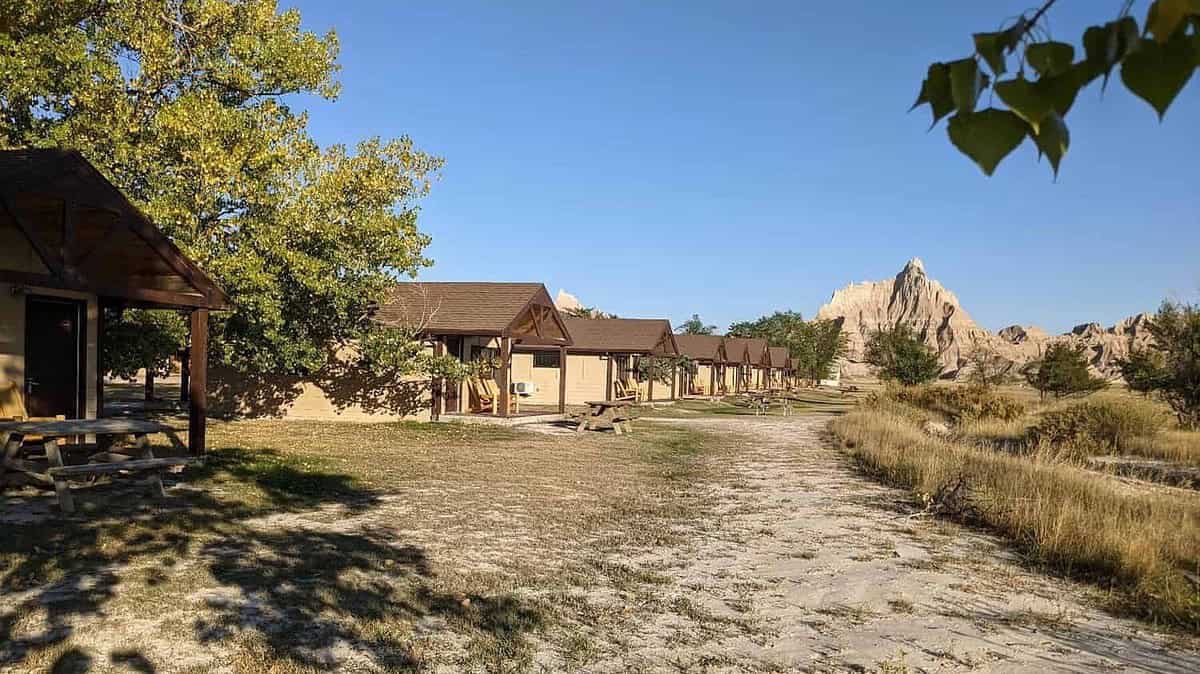
Overnight- Cedar Pass Lodge In Badlands National Park
I have stayed at a few national park lodges and I will have to say Cedar Pass Lodge was one of my favorites.
I am usually underwhelmed by the offerings inside national parks and find I either suck it up so I can stay in the park or drive elsewhere for better accommodations but then have to commute back and forth. Sometimes the location is worth paying for and sometimes it isn’t.
In this case, Cedar Pass was absolutely worth paying for– the location is stunning and the little cabins were actually great and not terribly expensive considering. Plus, there is not much near Badlands which limits your choices so there’s that.
The lodge only had availability for 2 cabins for one night during our whole 6 days in South Dakota, so we took it and planned the trip around that. It was worth it. But book early if you are considering staying in the lodge.
Cedar Pass Lodge isn’t big- only has the restaurant/ reception area/ gift shop/ camping supply store in the main building and 26 cabins in an oval behind the main building.
We had 2 cabins that each slept 6 on 2 queens and a futon. The cabins were relatively new, spacious, clean and with wonderful little back porches from which to watch the sunrise/ sunset.
For more detailed information as well as pictures of the inside and outside of our cabins, as well about the restaurant on site, read OUR REVIEW OF CEDAR PASS LODGE AND CAMPGROUND IN BADLANDS NATIONAL PARK
Sunset and Stargazing
After getting dinner to go from the lodge restaurant and eating it at the picnic tables outside our cabins (read the blog linked above for more about the somewhat underwhelming restaurant), we walked out to a little rise near our cabin to get a better view of the spectacular sunset.
In October, the sunset was at around 620 pm and we watched the changing light play out across the rock formations of the Badlands until about 650pm. By 8 pm, the stars were out and we spent considerable time laying on our backs on the picnic tables enjoying the views.
It always amazes me how many of the dimmer stars are obscured by light pollution– when you can finally see the sky without it, it always takes me a second to recognize the big constellations like Orion or the Big Dipper as there are so many more stars around them than I am used to seeing. I am just sorry that I don’t have a good enough camera to capture what it looked like.
It is worth a trip to the Badlands for the sunsets and the stargazing alone.

Day 3: Badlands National Park & Wall Drug
Morning
- Sunrise outside cabins at Cedar Pass Lodge
- Breakfast in cabins
- 4.8 mile loop hike incorporating Saddle Pass, Medicine Trail, and Castle Trail
Lunch
- Picnic at Bigfoot Pass Overlook on Badlands Loop Road
Afternoon
- Drive through Badlands National Park and stop at most of the overlooks on the loop road.
- Get snacks and souvenirs at famous Wall Drug
- Drive Sage Creek Rim Road through the western part of Badlands NAtional Park back to Rapid City
Evening & Overnight
- Dinner in downtown Rapid City
- Stay at the Residence Inn Rapid City

Morning Day 3: Sunrise And Check Out of Cedar Pass Lodge In Badlands
We got up at 630 am to catch the sunrise after a great night’s sleep in our cabins at Cedar Pass Lodge.
The sun actually rose at about 650 am so we had plenty of time to get up and get outside. It was chilly but beautiful.
Then a quick breakfast in our room and packing up the cars. We brought some pastries, granola bars, and yogurt with us from Rapid City so we did not eat in the Cedar Pass restaurant for breakfast, although we saw fellow lodgers headed there in the morning.
We checked out at about 830 am which we definitely could have done faster but getting 7 people organized is slow going. Someone always loses an AirPod into a previously unseen black hole in the hotel room.
Our Big Hike In Badlands National Park: Saddle Pass-Medicine Root-Castle Trail Loop Hike
- 4.8 miles long, 2.5 hours, moderate difficulty, + 311 ft
- Pros– great views, peaceful stretches of prairie walking, fun rock scrambling
- Cons– very little shade, Medicine Root Trail can be a little boring if you don’t like prairie, Saddle Pass would dangerous to hike in rainy or icy conditions
We wanted to do one hike of at least a couple of miles as I feel that really gives you a feel for the place in a way that seeing it from the window of the car does not (even though driving the Loop Road through the park is fantastic).
I found this combo hike mentioned on several blogs and it turned out great. A steep but fun rock scramble up Saddle Pass gets you to some great views and then you a stroll down Medicine Root gives you plenty of time walking through prairie, one of my favorite things.
Then you finish on Castle Trail which alternates between prairie and then leads through the characteristic rock formations of the Badlands. Finish the loop with a scramble back down Saddle Pass to your car.
Everyone liked this loop hike and I would give it two thumbs up to about any aged kids as long as you were prepared to help them up and down Saddle Pass if they were super young.
Bring plenty of water, sunscreen, and hats as there was zero shade on this trail. Also, I would start early in the morning or late in the afternoon- this is not a good trail for the middle of the day as again, zero shade. It’s a theme in Badlands.
We started up the trail at 8:57 am and finished just before 11:30 am so it was a perfect morning hike.
For more details, including exact mileage, how long each section took us, maps, and lots of photos, read SADDLE PASS- MEDICINE ROOT- CASTLE LOOP TRAIL IN BADLANDS NATIONAL PARK

Lunch Day 3: Picnic At Bigfoot Pass Overlook On Badlands Loop Road
From the Saddle Pass trailhead, we drove 6 miles/ 15 min west on Badlands Loop Road until we got to the picnic area at Bigfoot Pass Overlook.
This isn’t a big picnic area, just 3-4 tables with a much appreciated canopy providing shade at each table. We managed to snag one as someone was leaving. It was busy and some people were just spreading blankets on the ground and not waiting for one of the few tables. Views were wonderful from here as they were from just about anywhere on the loop road.
If you are here in the summer, I would make a picnic at any of the pullouts instead of banking on getting a table at Bigfoot Pass.
Day 3 Afternoon: Driving The Loop Road Through Badlands National Park
After lunch, we packed up and got in the car to drive the loop road through Badlands National Park. We didn’t stop at every single overlook but almost every one. I can’t say that any of the overlooks were not worth stopping at but some were better than others. I will mention the ones we liked best.
We drove the Loop Road from the Fossil Exhibit Trailhead to the Pinnacles Overlook, which is about 17 miles and took us about 60 min, including stops. See the map of Badlands under the overview for Day 3 for locations of each stop.
Stop 1: Fossil Exhibit Trail
From Bigfoot Pass Overlook, we retraced our steps a couple of miles to go back to Fossil Exhibit Trailhead to start our Loop Drive.
This was a great little stop, a 0.25 mile long boardwalk with lots of cool information signs detailing the fossils that have been found in the Badlands and the animals and habitats that once lived here.
Plus, it tells you how to “read” the distinctive rock layers so noticeable in all of the rocks in Badlands and what climate was associated with each layer- ie a flood plain that had alligators or an ash layer that marks an ancient volcanic eruption. I found that part pretty neat because some of the layers were so distinctive, I could recognize them later in other parts of the park.
Stop 2: Panorama Overlook
One of the most popular overlooks, Panorama has a large parking area and a walkway out to a viewpoint where you can get a great 360 view (which makes the name a pretty obvious choice).
Stop 3: Homestead Overlook
Not one of the most popular overlooks in the park but this one struck me because of the sign which talks about the homesteaders that were encouraged to move to the Badlands after the railroad was built.
Standing on the edge looking down and picturing hundreds of checkerboard homesteads that ended up being “starvation claims” in the valley below was sobering. There is a reason why this area is called the “Badlands” and growing plentiful crops or feeding lots of cattle is not it.
Stop 4: Yellow Mounds Overlook
Stop here for one of your most colorful pictures from the Badands or if you are really into geology.
The yellow layer of rock in the Badlands is one of the oldest layers, put down about 65 million years ago when the shallow seas receded and the seabed exposed. This overlook is one of the best places to see the yellow layers although you can notice it in other spots in the Badlands.
Stop 5: Pinnacles Overlook
The biggest of the overlook stops, Pinnacles has several different vantage points and a breathtaking view of the Badlands. If you only stop at one place in Badlands, this should be it.


Afternoon Snack Break- Wall Drug
From Pinnacles Overlook, it is an easy drive out of the park’s northwest entrance to the small town of Wall and its famous drugstore.
If you have never heard of Wall Drug or seen one of their ubiquitous bumper stickers, it is definitely worth a read about the history of Wall Drug on their website. It is such a great story about perseverance and smart marketing. They went viral before the internet was even a thing.
I will say that previous visitors aren’t kidding about the sheer amount of signs for the drug store on I90 both east and west of Wall. The kids loved looking for each one. So we definitely had to make a stop and check it out to see what the fuss is about.
Wall Drug was different than I was expecting. I guess I was expecting one really huge store, like a super Walgreens but with a restaurant.
But in reality, Wall Drug was more a mini indoor mall with many different storefronts inside, plus a cafeteria, an ice cream shop, a drugstore, lots of western art, a outdoor courtyard with a dinosaur, and more. Basically it’s a hodgepodge of kitsch. And it’s a maze– we got split up looking at all the things and had to call cell phones to find everyone again.
So Wall Drug was neat and we got some souvenirs and a glass of the famous free water but it was also busy and a little disorienting inside. Parking was hard to find. And if it was this busy on a Monday in early October, I can’t imagine what it would be like in the summer.
So should you stop at Wall Drug? Yes if quirky, touristy, or famous attractions is your thing. If you need something to eat and don’t mind a crowd, you could get a good meal here. Otherwise, you might want to spend more time in Badlands.


Late Afternoon: Sage Creek Rim Road in Badlands National Park
25 miles/ 60 min driving/ 3 short stops
After our Wall Drug adventure, one car of adults and kids headed back to our hotel in Rapid City via the interstate while the other car (my car) decided to go back into Badlands National Park and drive Sage Creek Rim Road.
Sage Creek is a packed gravel road that takes you to the western entrance of Badlands National Park through the Sage Creek Wilderness area. You can exit the park and get back to Rapid City via Sage Creek, albeit much longer.
Altogether, it took my car almost 2 hours from Wall Drug to Rapid City via Sage Creek Rim Road. For comparison sake, the other car that went straight back to Rapid City from Wall Drug took a little less than an hour.
It took us just over an hour to get the 25 miles from the Pinnacles Overlook (where the gravel Sage Creek Rim Road starts) to the intersection with Highway 44, near the tiny town of Scenic on the far side of the park. From Scenic, it was 45 min straight back to Rapid City on Highway 44.
So driving the Sage Creek Rim Road added about an hour onto our journey. But I really enjoyed the west side of Badlands National Park and would do it again.
There was hardly anyone on Sage Creek Rim Road, especially after you passed the popular Roberts Prairie Dog Town overlook near the beginning. And the scenery changed from the dramatic rock formations to rolling prairie as we went and made for a beautiful and peaceful drive.
The graded and packed gravel road was in great condition and I don’t think any car would have trouble except in extremely rainy or snowy conditions. You just couldn’t go much above 25 mph in most parts, at least I didn’t in my rental car. (We were passed by a local doing about 50 mph at one point so you could go faster obviously. It was one of the few cars we saw on the road.)
Along Sage Creek Rim Road, we stopped at:
Hay Butte Overlook
I loved the sign here describing how settlers would actually climb to the top of the buttes in the distance to mow the grass for hay. It just goes to show how determined the homesteaders were to make a go of it despite the difficult conditions in Badlands.
Roberts Prairie Dog Town
One of the largest prairie dog towns easily accessible from the road, this is a great place to stop if you think these little guys are beyond cute like I do. Just be sure to keep a safe distance because 1), it isn’t nice to harass wildlife, and 2), these guys have fleas that can carry fun diseases like the plague.
Sage Creek Overlook Basin
I really liked this overlook as you have rolling prairie in the foreground and the tall rock formations in the distance. This is a popular place to do some backcountry hikes and you can see paths through grasses down from the parking area.
I wish we had gone for even a short stroll because I later found out there are some cool yellow mounds just down below the parking area. But we were a little pressed for time since I didn’t how long it would take us to get back to Rapid City and meet the rest of the group for dinner. Next time, I will definitely pencil in some time to go hiking around this area.
*Tip- There is a backcountry campground off of Sage Creek Rim Road (the appropriately named Sage Creek campground). It looks lovely if you are good with vault toilets and not being near any supplies. Check out the pictures on Google Street View if you are interested, some helpful person has uploaded a couple.


Dinner in Rapid City
We drove to the cute and walkable downtown of Rapid City for dinner and decided to stop at the Que Pasa Cantina because the weather was nice and they had a huge patio. The food was good and we liked the ambience of the patio but I thought the other 2 places we ate in downtown Rapid City, Firehouse Brewing Company and Sabatino’s Italian Ristorante, were better.
There is a lot to choose from in the 20 or so blocks that make up the main part of downtown of Rapid City so if you head there and walk around, I am sure you will find something that looks good.
Day 3 Overnight: Residence Inn Rapid City
We stayed again at the Residence Inn Rapid City. If it ain’t broke- don’t fix it. Plus, they let us leave luggage behind the desk from our previous stay on Day 1.
Day 4: Black Elk Peak in Custer State Park & Mount Rushmore
Morning
- Hike Black Elk Peak, the tallest point in South Dakota
Lunch
- On the trail
Afternoon
- Drive through Custer State Park’s 2 famous scenic roads to Mount Rushmore
- Tour Mount Rushmore
Evening & Overnight
- Dinner in downtown Rapid City
- Stay at the Residence Inn Rapid City

Morning- Black Elk Peak Hike
About 8.4 miles total, 5 hours 15 min, 1453 ft total ascent according to my watch
Several people in my family are “est” people as I call them- they like to check off the highest, the lowest, the farthest, longest, etc thing they can find in a place. So when we discovered Black Elk Peak is the highest point in South Dakota, it immediately moved up our to do list for our trip.
Black Elk Peak was a fabulous hike and I highly recommend it. It isn’t a technically difficult hike, just a long uphill, so if you take your time and make sure you have plenty of snacks and water, I think about any family can do it. Plus, the scenery is fantastic so lots of places to stop and enjoy the view.
We went super slow because we kept stopping for snack and picture breaks. And because our family has 7 people in it. 7 people never do anything fast.
We pulled into the parking area at Sylvan Lake at 830 am, were on the trail by 9 am, and back at the car by 2:15 pm.
There are several routes up to the peak and we chose to do the #4 trail up to the peak and come down the #9 trail (also called the Black Elk Peak trail). This is slightly longer than taking just the #9 trail up and back but not by much and I always prefer a loop over retracing my steps.
Plus, you can swing by Cathedral Spires and Little Devils Tower on the way up as well if you take the #4 trail. They are short detours (less than a mile each) to awesome rock formations.
The #4 trail and the #9 trail start at Sylvan Lake in Custer State Park so you will need to buy an entrance pass for the park, although the peak itself is just outside the park in the Black Elk Wilderness. A 7 day pass is $20 and can be bought at the entrance stations.
Sylvan Lake is gorgeous itself so pencil some time to explore that a little or even rent a kayak/ SUP to enjoy a refreshing post hike cool off. (Not an option for us in October but would totally have done that in July.)
The parking area for both trailheads had flush bathrooms (they are closed in the winter), a vault toilet nearby, and there is a lodge and general store (also closed in winter).
For more detailed information like mileage on each section and trail maps for our hike up to Black Elk Peak and oh-so-many pictures, especially of the mountain goats we ran into, read HIKING BLACK ELK PEAK WITH KIDS.

Late Afternoon Day 4- Mount Rushmore
The planned Scenic drive from Sylvan Lake thru Custer State Park was not to be
My original plan was to take the afternoon to drive from Sylvan Lake to Mount Rushmore through Custer State Park. That route takes you on two of America’s most scenic roads- Needles Highway and Iron Mountain Road– which I had heard were absolutely gorgeous. Tunnels through rock, peeks of Mount Rushmore in the distance as you come around corners, plus you get to see a lot of Custer State Park. Sounds great right?
The downside to my plan was that these 2 roads take over an hour each to drive, despite being only 14 miles and 17 miles long respectively. That tells you how curvy they are.
We drove just 6 miles of Needles Highway on our way to our Black Elk Peak hike that morning and already had several kids not loving it. It was clear that we weren’t going to make my scenic road trip without some unscenic scenes in the backseat.
So we changed plan and drove the shorter and less nausea- inducing route to Mount Rushmore via Highway 244. It only took 30 min versus the several hours it would have taken to go through Custer State Park.
* We did manage to drive all of at least Needles Highway later in the trip and it was beautiful. And busy. I can’t imagine how slow going it would be in summer with even more cars stopping to take pictures. And the tunnels are one way so you have to take turns with oncoming traffic.
Mount Rushmore was more fun than I thought it would be
To be honest, we really were visiting Mount Rushmore because it was there and we thought it was something we should check off the list. (I normally am inclined to skip big tourist attractions like this.)
And we had family friends who had visited that summer and said the new Visitor Center was pretty cool and they had found their visit surprisingly fun. So I was not really sure what to expect besides a large rock with 4 ginormous faces carved into it.
And I will have to say Mount Rushmore was more fun than I thought it would be. For one thing, that is one really huge carving. Pictures and videos don’t do it justice. You need to see it in person. There is a handy amphitheater right outside the Visitor Center and we found ourselves just sitting and taking in the view for awhile.
Our friends were right and the Mount Rushmore Visitor Center was pretty cool as well. Lots of video and photographs talking about the making of Mount Rushmore, which was a massive undertaking.
The main sculptor, Gutzon Borglum, was an interesting man who devoted 16 years of his life to the project and his son, Lincoln, is the one who eventually finished it. The exhibits cover their stories plus those of the 400- odd workers who spent 14 years in tiny metal chairs dangling off the side of a cliff to carve the faces for $8 a day, good pay in the Great Depression I guess.
The 14 minute park film was also interesting, plus we appreciated the fact we got to sit down after our long morning hike. The Avenue of Flags leading up to the Memorial from the parking area was also pretty neat and the kids spent some time locating Tennessee’s flag.
One of the things we liked best though, was how not crowded the memorial was compared to stories I had heard. This was definitely due to our visiting in October. There were still lots of people there but it was easy to maneuver around, especially in the Visitor Center where we had plenty of room to see all of the exhibits.
3 things I wish we could have done at Mount Rushmore that we didn’t have time for or were already closed for winter:
1. Walk the 0.6 mile Presidential Trail that takes you to the base of the mountain. But none of the kids wanted to do any more walking in the woods and certainly not if it involved 422 stairs. Showers and a sit down meal were calling us after a long day.
2. Visit the Sculptor’s Studio which has large scale models of the entire sculpture Borglum was intending to carve before WW2 caused a halt to the project. I did not know that the sculptures you see now are only part of the original plan. The studio closes for the season on October 1 so we missed that.
3. Watch the Evening Illumination Ceremony. The ceremony comprises a ranger talk plus a film and ends with the lighting of the sculpture. This only happens from the end of May to the end of Sept. In the winter, they just illuminate the memorial at sunset without the ceremony.
The NPS website for Mount Rushmore has a good list of all of the operating hours for all the things to do at the memorial.
Mount Rushmore does not have an entrance fee but it does have a $10 parking fee, which basically means it does have an entrance fee since almost everybody drives there. Seniors are $5 and active military are free.
Parking passes are good for a year which seems unusually long but hey, I guess it’s more value for the money. I thought maybe we might find a moment during the rest of our trip to come back at night and see the memorial lit up but we never found the time.

Day 4 Overnight: The Residence Inn Rapid City
From the parking garage at Mount Rushmore, we drove 30 minutes back to our hotel in Rapid City for much needed showers and food for our “starving children” (their words).
We stayed at the Residence Inn Rapid City again, same as last night which was so nice because we did not have to pack up and check out this morning. I dislike moving from place to place on a vacation because I hate packing and unpacking. But I also like seeing new places so it is always a push/ pull.
I would have loved on this vacation to have rented a cabin in Black Hills and done everything in the area over several days but it just didn’t work out that way with the timeline and lodging availability unfortunately.
Dinner In Rapid City- Sabatino’s Italian Ristorante
This was one of those accidental yet wonderful finds you get on trips. After everyone showered and were no longer covered in trail dust and sweat, we drove the quick 10 min from the Residence Inn to downtown Rapid City and parked in one of the free parking lots.
Our plan was to walk around and pick what looked good from the restaurants in the cute downtown area.
One of the kids stopped outside Sabatino’s Italian Ristorante on Main Street and decided he wanted Italian. Then everyone decided pasta was a fantastic idea and next thing we knew, we were asking the host if they had room for 7 people.
I didn’t realize Sabatino’s was a little more upscale than our usual kind of places until they were seating us. But the waitstaff was so friendly and never made us feel unwelcome even though some of the kids were in sweat pants.
Maybe because we had worked up an appetite but we all thought the food was amazing and we had a wonderful time. It was more expensive than we had originally planned on but it turned out to be such a great night and a good family memory so we all thought it was well worth it. Two thumbs up for Sabatino’s.
Day 5: The Mammoth Site & Custer State Park
Morning
- Rent bikes for tomorrow’s ride on the Mickelson Trail
- Visit The Mammoth Site
Lunch
- In Custer
Afternoon
- Drive through Custer State Park
Evening & Overnight
- Dinner in Custer
- Stay at the Holiday Inn Express Hill City
*A Couple Of Notes About Days 5 & 6 Of This Itinerary
Our group of 7 was now down to 2: me and one 12 year old boy as everyone had to fly home earlier than us for other commitments.
I originally had “Bike Mickelson Trail” penciled in for both of these days and then left it like that to see what the weather was going to do. It turned out to be rainy on Day 5 and sunny on Day 6 so we obviously chose to go biking on Day 6. That left us with today to fill in with things we hadn’t got around to yet, like seeing more of Custer State Park and The Mammoth Site.
Morning Day 5: The Mammoth Site
Originally we wanted to see if we could get on another cave tour at Wind Cave as my 12 year old nephew really liked the cave and wanted to do the Garden of Eden tour this time.
But even though we got there about 930 am, the cave tours were already full until late afternoon. I was surprised because nothing had been very busy on our whole trip but it was a Saturday.
The weather had turned very rainy so we decided to go for an indoor activity and headed to nearby The Mammoth Site.
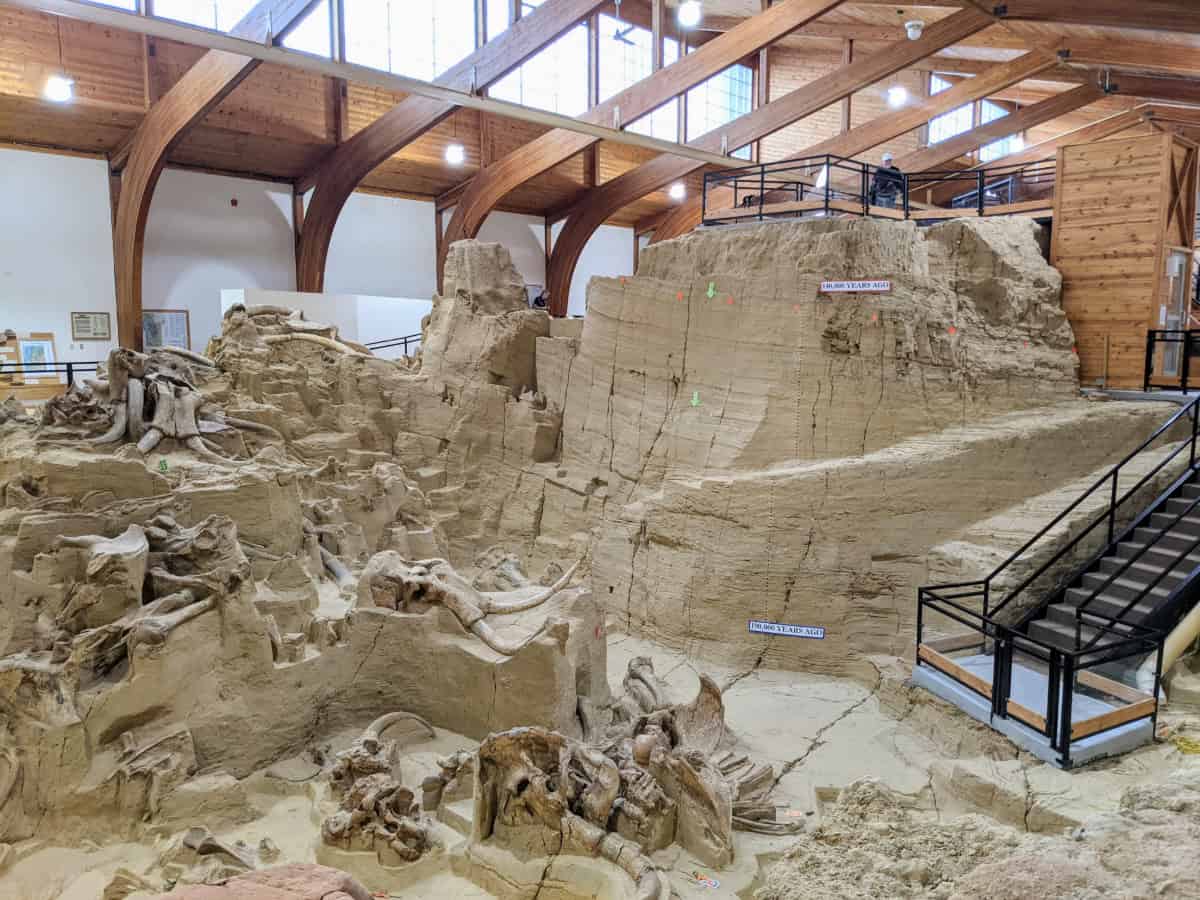
The Mammoth Site is an active archaeological dig at a prehistoric sinkhole where over 60 mammoths (and several other creatures) have been preserved in layers of rock. It was unlike anything I had ever seen and we thoroughly enjoyed it.
Not too big but with a ton of really cool stuff to see inside, the Mammoth Site was perfect for filling up a rainy morning. We spent a little over an hour in the museum and I would highly recommend it to anybody visiting the area.
If you want the full details and more pictures, check out The Mammoth Site: A Hidden Gem In The Black Hills of South Dakota.
Bike Rental in Custer
We decided to go ahead and get our bikes today so we could get an early start tomorrow morning to ride the Mickelson Trail. Especially since the next day was a Sunday and I didn’t think anything would be open early.
We rented from South Dakota Outdoor Shop in the town of Custer and I really liked them but unfortunately, they are no longer doing bike rentals I believe. The website says they have sent their bike business to Black Hills Power Bikes, which mostly does ebikes.
I kinda wish we had been able to rent ebikes on our visit because we could have done quite a bit more of the trail so I will look at them for our next visit.
Many of the bike rental places around the Mickelson Trail were already closed for the season by our visit October 10 (October 1 does seem to be an unofficial “closing time” for the area). So you might have to do a little more Google searching and call a couple of places to clarify hours if you are coming in the “off season” like us.
Or conversely, if you are coming in summer, I would still call to reserve bikes because it gets crazy busy from what I hear. There are quite a few rental places in Hill City, Deadwood, and Custer (which are along the Mickelson Trail), as well as in Rapid City. If you rent in Rapid City, you would have figure out how to transport the bikes to the Mickelson Trail, either by renting a bike rack or hiring a shuttle which is pretty common.
We were able to stick two bikes in the back of our rental SUV with the rear seats down and some jenga-ing. This is where being down to 2 people really helped because if we were still in our group of 7, we would have to organize a shuttle service or just ride the section of the Mickelson Trail that runs through Custer. Which would have been fine but not quite as scenic as the section we drove to.
Lunch In Custer
Custer has a small but cute downtown area with a wide main street and a decent number of restaurants and shops. We stopped in at Maria’s Mexican, an unassuming place with good prices and ample portions, perfect when you are trying to feed the bottomless pit that masquerades as a pre-teen boy.
Day 5 Afternoon: Driving Through Custer State Park
Since we had a free afternoon, we decided to try again for the 2 scenic roads in Custer State Park- Needles Highway and Iron Mountain Road. Or maybe drive the famous Wildlife Loop through the southern part of the park.
I thought we might have more luck this time around because the kids that usually get the most car sick had already left to fly back home. I was down to one kid so, fingers crossed, we set out.
We drove 15 min from Custer north on SD-89 to Sylvan Lake, then turned right and started east on Needles Highway. Needles is an incredibly scenic road that makes you feel like you are driving right through the stunning rock formations all over Custer State Park. Oh wait, you are.
It is absolutely worth driving this road, although I can imagine in summer that it is slow going. Even in the less busy off season, we still had to wait in a little bit of a line to go through the one lane of the rock tunnels.
Needles Highway is very, very curvy so despite our slow going and him riding in the front seat, my passenger still felt a little off by the time we got to the State Game Lodge in the middle of Custer State Park.
It took us about an hour to drive the 20 miles from Sylvan Lake to the State Game Lodge and we didn’t stop and get out at any of the overlooks or parking areas. That tells you how curvy the Needles Highway is.
We stopped at Coolidge General Store near State Game Lodge for a bathroom break and snacks (did I mention I had a 12 year old boy with me? There are never enough snacks in the car). Then we drove around a bit to explore this part of the park, which is kind of the main visitor area of Custer State Park.
The State Game Lodge, the Creekside Lodge, the Game Lodge Campground, the Peter Norbeck Outdoor Education Center, and the Visitor Center are all here in this central part of Custer State Park.
There was a herd of Bighorn sheep on the lawn in front of the Peter Norbeck Education Center and a lovely fall wedding going on at the State Game Lodge so there was lots to see.
Unfortunately that meant we didn’t roll up to the Visitor Center until just before 4 pm and it closes at 4 pm from October 1- Memorial Day. (Remember when I said October 1 is the unofficial closing date for the Black Hills? So very true. That was on me for not checking times.)
The famous Wildlife Loop in Custer State Park was also closed for road repair, another thing we ran into a couple of times on our trip, e.g. in Wind Cave National Park when the road to Rankin Ridge trail was also closed for repair.
I guess there is a short window for that kind of thing in this area– trying to squeeze in maintenance in the short window between the busy tourist season and when snow starts falling. I still wouldn’t trade the lack of crowds in October and the occasional inconvenience of things closed for the more crowded summer months.


Dinner: The Custer Wolf in Custer
I still wanted to try Iron Mountain Road out of Custer Park with its famous views of Mount Rushmore in the distance but my motion-sick prone, 12 year old copilot was a firm “No way.”
So we drove 30 min back to Custer on the not super windy Highway 16A for an early dinner at the highly recommended The Custer Wolf. And it did not disappoint.
We ate at the bar and thoroughly enjoyed our food at this family- friendly, upscale pub. It was more expensive than our lunch at Maria’s Mexican but I thought the caliber of food and its good- sized portions were well worth it. It was one of my favorite meals in the Black Hills and my 12 year old nephew agreed (he is a bit of a budding foodie). Open 1130am- 8pm, closed Thursday and Sunday.
Day 5 Overnight: Holiday Inn Express Hill City
We stayed at the Holiday Inn Express Hotel & Suites Hill City, which was a fine hotel, exactly what you would expect from a Holiday Inn Express, if on the nicer end of that expectation.
We had a standard 2 queen room that was perfect for us and the hotel was within walking distance of the main street of Hill City with its restaurants and shops. We enjoyed the included breakfast the next morning.
The front desk staff were friendly and helpful and let us store our luggage with them the next day after we checked out so we didn’t have to keep it in the car while biking the Mickelson Trail. We would stay here again.
Day 6: Biking the Mickelson Trail in the Black Hills of South Dakota
Morning/ Early Afternoon
- 34 mile ride on the Mickelson Trail
Lunch
- On the Mickelson Trail
Afternoon
- Bike rental return and delicious ice cream in Custer
Evening & Overnight
- Dinner in downtown Rapid City
- Stay at the Fairfield Inn & Suites Rapid City
The Mickelson Trail
If you ask my 12 year old nephew, he will tell you this was his favorite day of our South Dakota vacation. And I would have to agree.
Of course, we are the cyclists out of our family so that makes sense this would be our favorite day, but I think even if you weren’t a big bike enthusiast, the gorgeous scenery of this 109 mile long rails-to-trails project would win you over.
There are lots of trailheads along the Mickelson Trail as well as several towns so this can really be a choose your own adventure sort of day. There are people who do the entire 109 miles in a single day but I would say most tourists do an out and back trip from one of the bike rental places in Deadwood, Hill City, or Custer.
We decided to do the section of the Mickelson near the Mystic trailhead. This section has all 4 of the old train tunnels on the trail, something we also really wanted to see.
So we planned on taking our rental bikes in our car and driving the 30 min to the town of Mystic. (Spoiler Alert- Mystic is not really a town, there is nothing there besides a couple of houses, a historic church, and the trailhead. Don’t plan on getting gas or supplies for your ride there.)
We started our ride at about 945 am on a Sunday morning in early October. We rode north from Mystic (MP 74.4) to MP 89 and then back towards Mystic and past it to MP 72. Then turned around again for a short trip back to Mystic TH and our car. This route got us to all 4 train tunnels. We finished our ride at about 230 pm.
If you want more information about the trail, including pictures and video from our trip and more detailed mileage/ elevation/ and time it took us, read AN AWESOME DAY BIKING THE MICKELSON TRAIL WITH KIDS
Late Afternoon: Bike Return and Ice Cream in Custer
We drove back to Custer from Mystic to return our bikes at the South Dakota Outdoor Shop. From there, we walked down the street to the super cute Horatio’s Homemade Ice Cream.
I loved Horatio’s as it had delicious ice cream with some unusual local and seasonal flavors, like rhubarb. It also had sorbets, sherbets, and non- dairy options so something for everyone. I had a tasty chocolate chip cookie ice cream sandwich while my nephew had a gargantuan waffle cone (homemade of course).
Horatio’s is located in a lovely old bank building on the National Historic Register so it has a nice vibe as well. The ice cream is kept in the old vault in fact. You should definitely check this place out if you are in Custer.
Day 6 Evening and Overnight: Fairfield Inn & Suites in Rapid City
Feeling very full from our massive ice cream fest at Horatio’s, we drove from Custer to Rapid City, via Hill City to pick up our luggage at the Holiday Inn Express from the previous night. We stayed in Rapid City on this night because we were flying out early the next morning.
After checking into the Fairfield In and Suites Rapid City, we drove 10 minutes to downtown Rapid City to find something to eat. We ended up at Firehouse Brewing Company, the brewpub we had eaten at earlier in the week but one my nephew requested we eat at again because he liked it so much.
I am always up for craft beers I can’t get at home, not to mention tasty food at good prices, so that was an easy “Yes” from me to eat at Firehouse again. We sat outside this time in the covered patio and I really liked the ambiance under the fairy lights and especially under the heaters in October.
The Fairfield Inn and Suites Rapid City was fine although I didn’t like it quite as much as the Residence Inn that we stayed at previously which was next door. The Fairfield Inn was super busy while we were there and because it is directly attached to the Watiki Waterpark, with rooms overlooking it, the guests were mostly families with small children running around in bathing suits.
Had the kids been younger, this absolutely would have been us and they would have loved it. As non waterpark- participants on this trip, it made the crowded breakfast room a bit of a pain. But nothing that would prevent me from staying at the Fairfield Inn again, it is just that I didn’t like it quite as much as the Residence Inn if I had a choice and the prices were similar.
Day 7: Fly Home to Tennessee
Helpful rental car return tips for Rapid City
This isn’t technically a day on the itinerary since all we did was return the rental car to the Rapid City Airport and fly out but I thought I would add some info about that.
There is a large Exxon with a car wash at the corner of the Highway 16 bypass and SD- 44, just 6 miles from the airport. It is basically your last chance to refill your rental car tank and if you are like us, give the car a much needed wash and vacuum out. Plus, you can buy some snacks for the plane.
The rental car return at Rapid City’s airport is pretty easy, just park in the rental car lot around the side of the airport in a spot with a sign from your rental company, make a note of the spot number, and take a picture of the odometer and the gas gauge.
Then you walk inside to the counter and show it to the clerk when you drop the keys off. The rental car kiosks are small counters with often only one person working so they don’t walk out to the car to check themselves. At least they didn’t for us.
Rapid City Airport Check-In
The Rapid City airport is small but nice and clean. The check- in for our flight had a line but that was only because lots of people were trying to rebook their flights ahead of the predicted snow coming the next day. (It did in fact snow quite a bit the day after we left. 80 degrees to snowing in a couple of days is impressive.)
There is a lovely little rooftop deck area in the Rapid City Airport where you can admire the views of the Black Hills in the distance. It is pre-security though so we didn’t spend too long here, preferring to go ahead through security in case there were lines. No worries though, security was speedy to get through as again, this is a small airport.
Final Thoughts
I loved our vacation in South Dakota. The hardest part of writing this blog was not including a 1000 pictures because I had so many gorgeous ones. Look South Dakota, you really have an embarrassment of riches here- not only do you have the Badlands and Custer State Park, but also super cool Wind Cave and Mount Rushmore?! And the amazing Mickelson Trail?!
And we didn’t even get to Jewel Cave or Spearfish Canyon or Deadwood, which are all supposedly fun things to do in the Black Hills as well. Oh well, guess we will just have to go back. How sad for us 😉
Happy Trails! – Amanda


